Monday, December 16, 2013

Gem Rings - Last-Minute Cheap & Easy Gift Idea That Kids Can Make!


My kids absolutely loved making this Christmas gift!  It only takes a few hours and cost me under $5 to make 9 rings. 
 
 
You Need:
A variety of old nail polishes (including clear coat)
A bag of large-sized clear gems (I got mine at the local Dollar Tree)
Ring backs (I got mine at Pat Catan's)
A hot glue gun
 
 
How To:
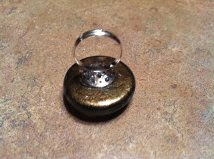
My 3-year-old schooled me in this project.  See that really cool-looking ring below?  She made it.  By herself.  All you do is flip the gem over to the flat side and start layering on the nail polish.  Start with the lighter colors and get creative.  Then add the darker colors, but make sure that each layer dries completely before painting on the next color.  Paint the whole area with your last color (so that it looks uniform), let dry, and then paint with a clear coat to "seal" it.  If you want to add a clear nail polish containing glitter (see bottom right of above pic), do so on the bulbous side after the flat side is completely dry (and then cover with clear coat).  When rings are dry, attach the ring backs with a hot glue gun and Voila!  You have a bunch of cute, handmade gifts to give away to some very lucky ladies :)
 
(I got this great idea from this tutorial on YouTube.)


Tuesday, November 26, 2013

DIY Gifts for "Natural Product" Lovers

I don't know about you, but I'm in Christmas mode - and that means I'm thinking about what to give all of the lovely people in my family this year.   I wanted some ideas on natural, chemical-free presents I could make for a few individuals, so I decided to create a Pinterest board dedicated to just that - DIY Gifts for "Natural Product" Lovers.  While you're fighting that after-turkey nap, kick your feet up and check it out!  There are some really great gifts on there :)


Thursday, November 21, 2013

Medicine Cabinet Detox Project - Easy Homemade Cough Syrup Recipe

When I say easy, I mean easy!  This recipe is basically herbalist Rosemary Gladstar's Honey Onion Cough Syrup recipe (I don't have a link to the recipe, otherwise I would have included it - here is a link to the video of her making it) - all I did was add some ginger and garlic as she recommends.  Just cover the three ingredients in honey, cook on low for about 30 minutes, strain and voila!  You have an awesome cough syrup.  (After I strained out the onions and garlic, I put them on the burgers I made that night - yum!)

According to www.livestrong.com, "Honey...has been found to be especially useful in treating upper respiratory infections.  A study at Penn State College of Medicine in 2007 found that a small dose of buckwheat honey was more effective than an over-the-counter cough treatment for children."  Not to mention the fact that the American Academy of Pediatrics now recommends that children under the age of four should not ever be given over-the-counter cough syrup (and I don't even use it myself due to the questionable ingredients, so why would I give it to my kids?).   Yet another reason to just go ahead and make your own!

Easy Homemade Cough Syrup
 Rosemary Gladstar says that this recipe is a remedy for colds, the flu, sore throats and coughs, and should be taken by the teaspoon (as needed) by children or adults as soon as they feel a cold or flu coming on, as it boosts the immune system.  (Due to the raw honey content, do not feed the syrup to children under the age of two.)  I didn't think I would like the flavor, but alas, I have been proven wrong.  I could do that bottle some damage!  My five-year-old even loves it.

Since I'm stingy with my raw honey (because it's usually expensive and I use a lot of it), I cut Rosemary's recipe in half and made a smaller batch so I'd have some honey left over for my Elderberry Immunity Syrup.  I'll bet you have all of these ingredients within reach - give it a try! 

Easy Homemade Cough Syrup

1/2 of a medium onion
1 cup raw honey (see instructions below)
1-2 cloves garlic, chopped
1/2-inch slice of fresh ginger

Directions:  Slice onion into very thin half-moons.  Place in an iron skillet or small saucepan and cover with honey until onions are just covered (depending on how big your onion is, it might take more than one cup).  Add garlic and ginger.  Cook on low heat for 30 minutes, or until onions become soft (make sure the heat doesn't go above low on your stove, otherwise the honey will become too hot and the enzymes will begin to be destroyed).  Strain and pour into a glass jar.  Label, refrigerate and use as needed.  The mixture should keep for several weeks.

Wednesday, November 13, 2013

Medicine Cabinet Detox: Elderberry Elixir Recipe (For Cold Care)


I can't even begin to describe how much I love this stuff!  It's like Elderberry Syrup on steroids.  I recently had a cold and took approx. 1/2 tsp of the elixir every 2 to 3 hours (along with about 1 tsp. of Fire Cider in the morning and at night), and my cold immediately started improving and was completely resolved within 2 days.  My husband was not a believer until HE got the cold...I started him on the same regimen (except he insisted on taking more than 1/2 tsp. at a time), and guess what?  His cold immediately started to improve and was gone within a day or two as well.  His only complaint was that it tasted like cough syrup, which it does, but that's because of the alcohol content.  The taste does not bother me at all, but it is strong.

According to herbalist Kiva Rose Hardin, " Elderberry is MUCH more effective when not heated in any way…  Elderberry does not simply stimulate the immune system, which would make it somewhat dangerous to those with autoimmune disorders or certain other chronic diseases. Rather it modulates the immune system to more appropriately respond to environs and circumstance. It also disarms the virus and helps it flush through body quicker, while strengthening the mucus membranes, supporting the body’s natural fever mechanism without overheating, improves energy and stress handling AND last but certainly not least, it tastes great too...If I had a snake bite, you bet I’d reach for the Echinacea. But for viral afflictions and general immune support, there’s no better herbal ally than the bounteous and lovely Elder!"

I would have to agree with Kiva - I did notice the huge difference in effectiveness between the unheated elixir and the heated Elderberry Syrup.  Her recipe on the link above is simple and great - just elderberries, raw honey and brandy - but I used a more "loaded" recipe from The Herb Society.  Please visit the link, because it includes some more great information on the Elixir, as well as variations and dosage information.  I did alter the recipe slightly based on the ingredients I had available at the time, so I re-wrote it below.   Hopefully, you will get over your initial fear of leaving a jar of edibles in the cabinet for 4 to 6 weeks like I did and give this a try.  It's probably my favorite cabinet detox project yet!

Elderberry Elixir
2 pint jar and lid - sanitized in boiling water
1/2 ounce dried elderberries (or 2 oz. fresh elderberries to fill approx. half the jar)
1 cinnamon stick
1 oz. ginger root, peeled and chopped
large handful of fresh rosemary and thyme (1/2 rosemary and 1/2 thyme)
chopped peel of half an orange
approximately 1 pint good-quality brandy
1/2 to 1 lb. honey

Directions:  Place the herbs in the jar, cover with honey and mix well with the end of a wooden spoon.  Add brandy until the jar is full to the brim and mix well again.  Place in a cupboard to macerate for 4 to 6 weeks.  When maceration is complete, strain with a cheesecloth (make sure to squeeze out the herbs well!) and store in a glass jar with a tight-fitting lid in a cool, dark place.

Dosage:  15 drops or 1/4 to 1/2 tsp. every 2 to 3 hours at the first sign of an oncoming cold.


Thursday, November 7, 2013

Medicine Cabinet Detox Project: FIRE CIDER Instead of OTC Decongestant!


Fire Cider...sounds intimidating, right?  Well, it smells intimidating, too, let me tell you!  I came across this traditional cold remedy recipe last year on the Mountain Rose Herb blog and made sure I had all of the ingredients to make it right at the beginning of the Fall, since it needs to "macerate" for approximately 4 weeks.  I know, it looks like orange juice, but looks can be deceiving!  According to Mountain Rose Herbs,  "The tasty combination of vinegar infused with powerful immune-boosting, anti-inflammatory, anti-bacterial, anti-viral, decongestant, and spicy circulatory movers makes this recipe especially pleasant and easy to incorporate into your daily diet to help boost the immune system, stimulate digestion, and get you nice and warmed up on cold days."  This remedy is a tangy, spicy, sinus-opening blend of vinegar, jalapenos, horseradish root, ginger, onion and turmeric, among other cold-symptom-fighting ingredients.  Thankfully, my batch of Fire Cider finished macerating the same week I came down with a nasty cold - and let me tell you, it cleared up my sinuses immediately and cut my cold symptoms IN HALF by the next day (I took a teaspoonful every 3 to 4 hours).  The cold was completely resolved within a few days.  (On a side note, my Homemade Vapor Rub was extremely helpful at night.)

Even though it's spicy, it's definitely tasty, and I'm looking forward to making a stir-fry and maybe even some salad dressing with this Fire Cider.  Instead of reaching for that OTC decongestant that probably contains phenylephrine (which boasts hypertension as its most common side effect), take a spoonful of Fire Cider instead!  It might cause your eyes to water, but that's about it in the way of side effects :). (See the link above for the recipe.)

**NOTE:  Don't get too close to the horseradish root while you are shredding it - it's about 100 times worse than cutting an onion.  Also, the turmeric will stain surfaces, so be careful to quickly wipe up any spills during the straining process.**

Thursday, October 31, 2013

A Month of Medicine Cabinet Detox Projects - Beginning With Honey Ginger Lemon Tea!

A few years ago, I began my "Cabinet Detox" projects after doing quite a bit of research on foods, ingredients and skin care products - and then reviewing the labels of the items in my cabinets.   To my utter shock and disgust, the products I had previously believed to be "healthy" were anything but.  It also began to dawn on me that just because I had been using certain products and eating certain foods for most of my life, those foods and products were not necessarily good for me or my body.  They were just "familiar", and possibly even recommended by one of my doctors.  So, rather than overwhelming myself with information and crazy recipes from Pinterest containing ingredients I couldn't locate, I took my husband's advice and simply took baby steps by completing one Cabinet Detox project at a time.

I found a great website containing information on herbalism, located a good herb supplier, and started making minor changes to my purchasing and eating habits (more organic and whole wheat foods, less preservatives and  processed foods, simpler skin care products).  It has been a long, slow process - one that is definitely still in progress - but baby steps DO make a difference, and before you know it, you are making multiple, positive changes to the products - and even the "medicines" - that you are using.  Those changes, once enacted, begin to build on one another, and after a few years, you realize you have quite an arsenal of recipes, and that your cabinets don't look anything like they used to.  For example, I began my Cabinet Detox Projects by replacing some of my personal care products with homemade ones, including Deodorant, moisturizing Lotion Bars and Lip Balm.  I also began overhauling my medicine cabinet, and over the last few years concocted Honey Ginger Lemon Tea and Elderberry Syrup for flu prevention and basic immune system boosting during the Fall and Winter months; Homemade Vapor Rub; Honey Onion Cough Syrup; and Garlic Cayenne Oxymel.  In addition, I just finished making a much stronger Elderberry Elixir (for adults) and HOT Fire Cider for the cold and flu season that I am very excited to share with you over the course of this month!

Considering both my kids are just getting over nasty sinus infections and sore throats, I have been using the Honey Ginger Lemon Tea and Elderberry Syrup quite a bit lately :). To whet your appetite, my recipe for Honey Ginger Lemon Tea is below. This tea is easy to make, tastes great, and I can attest that it greatly reduces the symptoms and duration of colds that I have had.   According to the University of Maryland Medical Center, ginger, in addition to helping in the treatment of the common cold and flu-like symptoms, can also be used to treat motion sickness, vomiting and painful menstrual bleeding.  I keep a bag of peeled, sliced ginger in the freezer year-round, as well as a bottle of lemon concentrate in the fridge in case symptoms strike when fresh ginger and lemons are not in the house.   I whip up a batch as soon as anyone in the family begins feeling sick, and then at least twice per day until the sickness is gone.  I hope you give it a try!  Stay tuned this month for more great Medicine Cabinet Detox Projects :)

Honey Ginger Lemon Tea

1/2-inch to 1-inch slice of fresh (or frozen) ginger root, peeled
4 cups water
3 squeezes fresh lemon juice (or one good squeeze of concentrate)
1 teaspoon raw honey (or more or less to taste)

In a saucepan on the stove, bring ginger root and water to a boil, then reduce to simmering for 20 minutes, or until the liquid has been reduced to half the original amount.  Remove from heat, pour into a mug, add lemon juice and honey, and enjoy!
*Please note - since ginger may increase the risk of bleeding, consult a doctor regarding ginger use if you are currently taking blood-thinning medications (including aspirin), diabetes medication or high-blood pressure medication (ginger may lower blood pressure in some people).*

Sunday, October 20, 2013

Roasted Acorn Squash Soup w/ Italian Sausage Meatballs


It's not as difficult as it looks - trust me.  If you roast the squash ahead of time, the actual soup making process is really quick, and can be done on a weeknight.  I don't put soup in food processors, no matter what the recipe says, because I'm rather clumsy (ladling hot liquid into an electrical device?  Um, no thanks). In this case, I used my (cheaply made) immersion blender, and it worked just fine.  I decided to whip up the meatballs so that my picky family would actually eat it.  If I served the soup alone in a bowl, I would get all kinds of "ick" faces and whining, so I decided to sidestep that and make it yummier in the process.  My husband and 5-year-old loved it.  The 2-year-old ate it, and that was good enough for me.  I thought it was delish, and a nice, warm, hearty meal for a cold fall day :)

Roasted Acorn Squash Soup With Italian Sausage Meatballs

Soup
2 medium acorn squash
4-6 cups chicken broth (I added a little chicken bouillon for added flavor)
salt, pepper, and onion powder to taste
1 Tbs butter
2 Tbs fresh sage, chopped (or 1 Tbs dried)
Some of the sausage oil
Parmesan or Romano cheese for garnish

Slice the acorn squash lengthwise and remove seeds and pulp.  Place with the cut side down on a roasting pan filled with 1/2 cup water in a 350 degree oven for 45 minutes to 1 hour (or until cooked through and tender).  Remove and let cool.  Once cool, scoop out the squash and mash it with a fork.  Place in an airtight container in the fridge if you are making the soup another day.  If not, add the squash to a large saucepan with the chicken broth, salt, pepper, onion powder, butter and sage, and bring to a boil.  Reduce heat to low, cover, and simmer for about 30 minutes, or until meatballs are finished.  When meatballs are done, pour some of the oil from the pan into the soup. Prior to serving, blend with an immersion blender.  Top with meatballs and Parmesan or Romano cheese.

Meatballs
5 links mild Italian sausage, casings removed
1 egg
1/4 cup Italian seasoned bread crumbs (or omit for a GF version)
a sprinkle of garlic powder
1/8 cup grated Parmesan or Romano cheese
1/8-1/4 cup frying oil (olive, coconut, etc.)

Mix all ingredients well.  Form into small balls and fry in oil until cooked through.  Serve with soup immediately.
Sweet and Savoury Sunday

Wednesday, October 16, 2013

Make Your Own Granola Cereal - No Refined Sugar or Preservatives!


If you're looking for a great-tasting, EASY granola cereal recipe that is free of preservatives and refined sugar (and can easily be made Gluten Free by substituting GF oats), check out my guest post on Home Hearted!  While you're there, take a look at Madalyn's other awesome crafty ideas and recipes :)

Thursday, October 10, 2013

Detox Project: Make Your Own Tinted Lip Balm (This One Smells Like Fall!)


Last year, I posted a Peppermint-Cocoa lip balm recipe that is perfect for the holidays.  Ever since then, I have been wanting to make a tinted version that would be just as natural, but without the Cocoa Butter (it has a strong scent).  I ended up using this base recipe from Wellness Mama, tweaked it a little, and absolutely LOVE the result!  I also love the fact that I can apply this several times a day without worrying about the presence of harmful chemicals (like petroleum derivatives) on my lips or in my mouth, and I can let my kids use it as well.

Please note that the tint adds only a hint of color to the lips, and this picture is deceiving because my camera is not great - it comes out more of a caramel color.  As I mention in the title, though, it smells like Fall and I simply can't get enough of it!

Tinted Lip Balm Recipe
1 tsp Beeswax Pastilles**
1 tsp Shea Butter**
1 tsp Coconut Oil
1/2 tsp Elderberry Syrup or Honey
1/4 tsp Cinnamon
2 drops Peppermint Essential Oil
1 drop Eucalyptus Essential Oil

Directions:  Melt the beeswax, Shea butter and coconut oil in a glass bowl in the microwave (about 1 minute - only until melted).  Quickly add the syrup or honey, cinnamon and oils.  Stir vigorously and continuously until well blended (might take a few minutes).  Once the mixture is blended, pour quickly into chapstick containers.  Let cool completely before using.  This recipe will make 2 chapsticks.

**I purchased the Shea butter, beeswax pastilles and chapstick containers from Mountain Rose Herbs.**

++Please Note: If you add cinnamon or another spice to this recipe, it will act as a type of "scrub" if you don't strain it out.  I don't mind it, but if you want a smooth balm, just use a tea ball or other small strainer and strain it as you pour it into your container.++

Thursday, October 3, 2013

Cabinet Detox: Easy Homemade Vapor Rub (For Babies, Kids & Adults)


Call me over-prepared, but yes, I'm making vapor rub in October, when it happens to be 75 degrees outside!  I grew up using Vick's Vapor Rub, and there's just something about the smell that is comforting when I have a cold or cough.  Due to the fact that OTC vapor rub contains petroleum derivatives, and the camphor in it can sometimes be too strong to use on kids, I have been wanting to make my own for a long time.  I finally found the perfect base for the recipe over at Home Hearted - Madalyn's Natural Vaseline Recipe has an amazing texture and blends right into the skin without leaving a greasy feel.  I simply added varying amounts of essential oils to the recipe  in order to make the Baby/Kids and Adult versions.  The smell is just as comforting to me as Vick's Vapor Rub always has been, and I'm elated to have a vapor rub on hand that I can use on myself and on the kids without having to worry about the presence of any nasty ingredients.  Thanks, Madalyn, for the awesome Vaseline recipe!

According to an article on essential oils from the University of Minnesota, "As a rule of thumb, essential oils should be diluted in a carrier substance (vegetable or nut oil, or water) at no greater concentration than 3-5%.  That means if you have one teaspoon (5cc) of carrier, you would add 3 drops of pure essential oil. This would make a 3% solution that could be used on a portion of the body...For infants, using a 0.25% solution is recommended (.5% for toddlers)."  I used this information in the formulation of the following rubs.


Vapor Rub For Kids

2 Tbsp olive oil
1.5 Tsp coconut oil
1/2 tsp Vitamin E oil
1/2 tsp beeswax
2 drops Eucalyptus Essential Oil (or less)
2 drop Peppermint Essential Oil (or less)

Directions:  Place all ingredients in a microwave-safe glass bowl or cup and microwave for 1 to 2 minutes, or until beeswax is melted.  Remove from microwave and add the essential oils.  Quickly pour into a tin or small glass jar.  **For the Baby Version:  Add only 1 drop of Eucalyptus oil and 1 drop of Peppermint oil.**

Vapor Rub For Adults

2 Tbsp olive oil
1.5 Tsp coconut oil
1/2 tsp Vitamin E oil
1/2 tsp beeswax
24-30 drops essential oils (a combination of Eucalyptus, Peppermint and Clove)

Directions:  Place all ingredients in a microwave-safe glass bowl or cup and microwave for 1 to 2 minutes, or until beeswax is melted. Remove from microwave and add the essential oils.  I added approx. 18 drops Eucalyptus, 8 drops of Peppermint, and 4 drops of Clove.  Quickly pour into a tin or small glass jar.

The recipes will make approximately 1 2-oz tin.  **Please note that the scent is very strong when you first put the essential oils into the mixture, but it diminishes substantially upon drying.**

Wednesday, September 18, 2013

Homemade Vanilla Extract - Great Holiday Gift Idea!


I know, I know, it's only September and I shouldn't be thinking about Christmas yet - but I am!  I have been wanting to make homemade vanilla extract for months, and it's finally time to make some for myself and a few to give away as gifts.  I bake a lot, and considering that everything from my homemade granola cereal to my oatmeal energy balls contains vanilla extract, I go through a bottle of the stuff every couple of weeks (I can't always find the larger bottles of pure extract at the stores I frequent, so I'm forced to buy those little chintzy ones for $3 a pop).  That being said, making my own is quite a bit more cost effective, and I'm guessing it will be quite delish.

I purchased the three glass bottles pictured below (which stand approx. 8 inches tall) at a garage sale for $2 (old dressing bottles would work well if you're not a garage saler), in addition to 2 bottles of brandy for $22 plus tax.  The two bottles of brandy made all three vanilla extracts, in addition to a quart-sized jar of Elderberry Elixir (recipe coming soon!).   I bought the organic vanilla beans from Mountain Rose Herbs for $7.50 plus shipping, and received 12 beans in the package, so I have enough left over to make another jar of extract.  After all was said and done, each jar of vanilla extract was still cheaper than a much smaller jar of the high-quality extract you can find in some stores - and the beans used were organic, to boot!  This recipe is so easy (and the result so pretty, especially to foodies like me) that I hope you give it a try!


Homemade Vanilla Extract

9 to 12 whole vanilla beans
2 bottles of good brandy
3 or 4 decorative glass jars with corks or lids (sterilized)

Directions:
Sterilize your jars and lids in boiling water for 7 minutes.  Let dry.  Place 3 to 4 vanilla beans in each jar and cover completely with brandy.  Place the lid on tightly and let sit in a cool, dry cupboard for 8 weeks.  Liquid will darken over time.  Use as needed after 8 weeks.

*I've read that, once the 8 weeks are up and you are using your extract, you can leave the beans in the jars and top off with brandy as needed for quite a while to keep up your supply.*
Sweet and Savoury Sunday

Monday, September 9, 2013

Crunchy, Zesty and Easy Fridge Pickles Recipe


If you've read my previous post on grape picking and canning jam, then you know that I'm not a fan of the canning process.  That being said, this recipe requires no canning!  Just follow the directions, place in the fridge, wait two days and Voila!  You have two jars of pickles that are better (and cheaper) than most store-bought varieties.  If you're like me, you will stare at them every time you open the fridge until those two days have passed :)  As an added benefit, they will keep in the fridge for several months, but I doubt they will last that long!

Items Needed:
2 quart-sized Mason jars, bands and new lids
6-8 pickling cucumbers (the fresher, the better), cut into halves or spears
2 cups distilled white vinegar
2-1/2 cups water (filtered or distilled preferred)
6 Tbs kosher salt
1 tsp red pepper flakes
6-10 garlic cloves, peeled and sliced in half
4-8 Tbs dill seed **
1 Tbs whole black peppercorns

**My first batch was a bit too zesty/salty, so I cut way down on the dill seed in my second batch.  You cannot cut down the salt, because the brine requires a specific proportion of vinegar and salt to pickle.  So adjust the dill seed according to your tastes.**

Directions:
-Sterilize the jars, bands and lids in boiling water (you really don't have to sterilize the jars, but I prefer to do so). 
-Divide the garlic, dill seeds, pepper flakes and peppercorns into the jars.
-Wash the cucumbers and cut off any bad spots, in addition to cutting off the stem ends.  Divide the sliced cucumbers into the two jars, leaving 1/2" to 3/4" space at the top.
-Combine the vinegar, water and salt in a non-reactive pot to make the brine.  Bring to a boil and stir until the salt is dissolved.
-Pour the hot brine over the cucumbers and leave 1/4" space at the top of the jars.  Wipe the top of the jars, put the lids on and tighten.
-Age for at least 2 days in the fridge.

**This recipe has been adapted from this website, and can also be used to pickle green tomatoes.**


Wednesday, August 21, 2013

4 Easy Ways to Keep A Preschooler Busy (While Trying to School or Otherwise Engage an Older Child)

As my homeschooling journey begins, (my Kindergartner starts next week), so does my very stressful journey of trying to keep my preschooler happily engaged while I am paying attention to her older sister.  Weeks ago, I started hoarding items from the Dollar Store (foam stickers, pipe cleaners, foam puzzles, googlie eyes, etc.) and scouring Pinterest for ideas.  Aside from the obvious Dollar Store item activities, (painting, sticking stickers on anything and everything, playing with foam puzzles,) below are my top 4 activities for keeping a preschooler busy - they are easy on you, fun for the kid, and most importantly, are not going to cause a mess that will only give you more work at the end of the day!  I hope your preschooler enjoys them, and that they provide you with whine- and cry-free time with an older child :).

1.) Homemade Flubber

Make it in advance, provide a few props (I use Playdoh dishes, molds and cutters) and let them go to town!  This stuff keeps my preschooler busy for up to an hour on some days.  The recipe can be found on this website.

2.) Color Sorting Activity

All you need to make this activity are multicolored pom poms from the Dollar Store, 4 old jars, and red, yellow, blue and green paint or tape.  Paint the lids of the jars and a stripe around the middle of the jars, (or paint the whole jars if you're feeling crafty).  You can also use colored tape (I used tape for the green one because I didn't have any green paint on hand).  Then have the preschooler sort the pom poms into the jar of the proper color.

3.) Build-Your-Own Felt Cupcake


I saw this on Pinterest, but it didn't have any instructions.  It intrigued me, though, because my preschooler plays the "Build-Your-Own Cupcake" app on my husband's iPhone all the time.  So, I used some felt and other items that I had on hand to make the cupcakes (sorry, I know they're sad -I'm not very crafty - and I only had about 30 minutes to make them!).  All I did was print out some cupcake and candy templates online and glue them to a piece of thin cardboard.  I then cut them out and used a hot glue gun to attach the felt.  I happened to have a strip of Velcro with an adhesive side lying around, so I cut it into pieces and attached only the rough side to the cupcake "decorations".  They stuck very nicely to the felt, and the girls had fun building with them. 
 
4.) Scissor Cutting and Tracing Exercises


I found this printable scissor cutting exercise (and a BUNCH more of them) on this website.  There are also some quality, printable tracing exercises on this website.  What preschooler doesn't want to play with scissors?!


Thursday, August 8, 2013

Easy Garlic Cayenne Oxymel Recipe For Cold & Flu Season (Start Preparing Early!)

What, you may be asking, is an oxymel??  According to herbalist Rosalee de la Foret,

"Oxymels are herbal preparations that date back as far as the ancient Greeks. They are made by combining herbs with both honey and vinegar.  These sweet and sour preparations are specific to the respiratory system and can be used for bronchial complaints, especially when there is a lot of mucous present - such as coughs that are thick with mucous.  I learned from herbalist Paul Bergner that William Cook, a Physiomedicalist of the 1800s preferred vinegar as a menstruum for issues of the respiratory system. He felt that it concentrated the herb’s actions to the respiratory system.  Honey in itself offers us a wide range of benefits for coughs and sore throats. It’s anti-microbial, inhibiting the growth of pathogens as well as slightly expectorant. As most of us know, a spoonful of honey can soothe a sore throat."

Now that you know what an oxymel is, this recipe is a quicker version than most others, which usually include the infusion of the herbs in the vinegar for several days or weeks.  As a result, this recipe probably produces a somewhat weaker end product, but let me tell you, it doesn't taste that way!  Just a half teaspoon cleared my sinuses right up!  This is most likely not a preparation that you will be able to get your kids to take, (while I was making it, my kids covered their noses and wouldn't come near the kitchen,) but it's definitely worth having on hand for cold and flu season.  Plus, I think it would make a yummy salad dressing.

Without further ado...


Easy Garlic Cayenne Oxymel

4 ounces apple cider vinegar (with the "mother", if possible)   5 cloves garlic, pressed
1/4 cup fresh sage*
a few sprigs of fresh thyme*
a small handful of fresh rosemary*
1/8 tsp cayenne pepper
5 ounces raw honey
*Note:  When substituting dried herbs for fresh, use 1/3 to 1/2 the amount.  Dried herbs are always stronger.*

Directions:
Heat apple cider vinegar to a boil.  (Make sure the garlic is pressed and the herbs are roughly chopped at this point).  Remove from heat and add all ingredients but the honey.  Stir and let steep with lid on for 15 minutes.  Strain through a coffee filter or cheese cloth.  Add honey and reheat ON LOW until just combined - not too much or the honey will begin to lose enzymes.  Pour into a glass jar with a plastic lid (or make sure there is some type of cloth or plastic wrap between the oxymel and a metal lid due to the vinegar content), and place in the fridge.  Will keep for up to one year.  Dosage is approximately 1 tablespoon as needed for colds or congestion.  Can also be mixed into a cup of tea.

*This recipe is from this website with slight alterations

***Keep an eye out for an Elderberry Elixir recipe for cold and flu season, which is a more "adult" version of my Elderberry Syrup recipe, coming soon!!***

Wednesday, July 24, 2013

Detox Project: Easy Sea Salt Face & Body Spray


 This is by far one of the easiest (and cheapest) of the detox projects I have done thus far, and I was amazed at the results!  I have "hormonal" skin, (i.e. acne), and for the past month I have sprayed this on my face after showering or before bed every night.  It has cleared up my acne better than all OTC and prescription creams I have tried - no joke.  And it smells great, which is another added benefit!  Give it a try - I think you'll be pleasantly surprised.  The recipe is originally from this website, but I re-wrote it below the way I made it for the sake of ease. 
Easy Sea Salt Face & Body Spray    
1 cup pre-boiled (heated to almost boiling) or distilled water        
1 Tablespoon sea salt
1 generous pinch Epsom salt
10 to 20 drops lavender essential oil           

Directions: Add the salts to the water while it is warm.  Then let the water cool if you are using a plastic spray bottle.  Pour the water and salt mixture into the spray bottle and add essential oils at the end.  Shake well.        


Tuesday, July 16, 2013

Oatmeal Energy Ball Recipe


This is possibly the best energy ball recipe I have found!  Unfortunately, I scribbled it on a piece of paper after seeing it on Facebook, so I have no idea where it came from.  They are delicious, however, and have been given rave reviews in my house by adults and children alike.  The recipe takes about 10 minutes from start to finish, and the last batch I made lasted in the fridge for approximately 3 weeks.  Too good not to give them a try!


Oatmeal Energy Ball Recipe

1 cup quick oats
1/2 cup chocolate chips
1/2 cup flax meal
1/2 cup almond butter (or peanut butter, but I prefer the taste of the almond butter)
1/3 cup honey
1 tsp vanilla extract

*Optional ingredients include coconut or dried cranberries.*

Directions:  Place all ingredients in a bowl and mix well.  Form into balls with clean hands (if your hands get too sticky, you will have a hard time).  Place in an airtight container in the fridge.  *Makes approximately 20 balls.*

Friday, July 12, 2013

Detox Project: Homemade Bug Spray!

I never had to use bug spray growing up, since I was a city girl, and city girls don't need bug spray.  However, after having children and moving to a house with a heavily wooded yard, I found myself in dire need of some.  The problem is, I refuse to use the chemical-laden kind available at the stores.  So, in that case, what's a city-girl-turned-country-girl to do?  MAKE HER OWN!  I found a great recipe on this website, and it has variations depending on the types of essential oils you have on hand.  Due to it being a very rainy summer around here, the mosquitoes are breeding quite rapidly and plentifully.  So, I doused myself with this bug spray just last night and went out to the woods at dusk.  I couldn't believe it, but it actually worked!  Not a single mosquito bite, despite the fact that I was practically in a swarm of them for at least a half hour.  Give it a try!  Next spring, I'm definitely going to make the more powerful Vinegar of the Four Thieves Insect Repellent variation. 

This is what I used:

1/2 Cup boiled or distilled water
1/2-3/4 Cup witch hazel
30 drops lavender essential oil
20 drops peppermint essential oil

There are more variations of essential oils that you can use here.  Give it a try!

Monday, June 17, 2013

Cranberry Chocolate Coconut Granola Bar Recipe


I spent months and months tinkering with various granola bar recipes, only to find many of them had a ton of honey, or fell apart, or were too crunchy.  Finally, I ended up updating my original granola bar recipe with more readily available ingredients and this is what resulted!  Tropical Traditions posted my recipe on their blog, and you can find it here.  (Note:  The recipe shows maple syrup, but I prefer to use agave nectar instead.  Same amount.)  These are ridiculously easy to make, yield a 9x13 pan full and are really, really yummy.  Plus, you can add or subtract ingredients according to your preferences, dietary restrictions or what you have on hand.  Hope you enjoy them!

Sunday, May 12, 2013

Tales From a Stay-At-Home Mom: "I'm Watching You!"


I was in the bathroom with my two daughters, and we were "doing nails".  I finished my younger daughter's toes, and then went to pick up the bottle of hot pink nail polish that my older daughter had picked out for her fingers.  Of course, she hadn't told me that she had already unscrewed the cap, so when I picked it up by the lid, the bottle went crashing to the floor and hot pink nail polish went flying (and I mean flying) all over the linoleum tile and cabinets (I'm still thanking God it missed my new white rugs.  White?  Really?? What was I thinking??).  It was the end of a very long day, and that was the last straw.  I started to lose it.  At that moment, when every curse word known to man was running through my mind and I started scolding my daughter for unscrewing the cap, my two-year-old said, "I'M WATCHING YOU!".  She said it in a sing-song voice that was reminiscent of something you would see in a Stephen King movie, but I don't think that's what stopped me dead in my tracks:  It was the fact that, in that instant, I realized that she was watching ME.  She was watching MY reaction in that situation.  In fact, she was watching every one of my reactions in every situation throughout every day.  The weight of the thought certainly took the wind out of my sails.

I still have no idea why she said it, or what she even meant by the comment.  I half want to think it was the Holy Spirit warning me through her - because not only was she watching my every move, but so was God.  My reaction to the nail polish debacle was not a graceful one, as it should have been.  My immediate thought was not to extend mercy; it was to punish.  The nail polish was only another mess in the string of messes that I clean up on any given day, and nothing was stained permanently, so I really didn't have anything to be upset about.  Just the fact that I had to clean up another mess when I had a whole laundry list of other things to do to get everyone ready for bed was what upset me.  I could make excuses all day long to justify my reaction in this situation, (or any similar situation, for that matter,) but it doesn't change the fact that I was wrong.  I reacted incorrectly, and my daughter called me out on it.  My two-year-old knew my response was not what it should have been, because I take time to try and correct her behaviour when it is out of line.  Obviously, she was returning the favor!

As mothers, we don't only teach our children their ABC's, how to have good manners, and how to tie their shoes or clean up after themselves.  We teach them - by our own actions and reactions - how to act and react to stressful, upsetting, frustrating situations.  For example, if I yell and scold and punish every time someone makes a mess or breaks something, I'm going to send the message to my kids that that's the normal way to respond to a mess or a broken item.  In that case, I would also be sending the message that the floor or broken object is more important to me than the person who made the mess or caused the breakage in the first place.  I would be placing undue significance on objects rather than my precious children, and years of that kind of behavior could certainly have a negative impact on their fragile psyches.  Now, don't get me wrong, obviously there are times when scolding or punishment might absolutely be necessary, but nail polish on the floor when it wasn't even her fault in the first place?  Ah, no.  My linoleum tile and cabinets are not worth wounding my little girl's spirit.  Join with me this week after Mother's Day in making an effort to be aware of the words you are speaking to your kids each day and the tones you are using when you speak them.  Let us be women who speak life - who speak with wisdom and have faithful instruction on our tongues (Proverbs 31:26, paraphrased).

Friday, April 12, 2013

Yummy Chocolate-Cinnamon Scones...Buttermilk Not Necessary!


I needed a scone recipe that didn't require buttermilk.  Of course, I couldn't find one that looked good, so I did a little searching and discovered that one cup regular milk mixed with one tablespoon of white vinegar would do the trick instead.  And it did!  These scones have a great texture and flavor.  Enjoy with a nice cup of tea and a good episode of Downton Abbey :)

Yummy Chocolate-Cinnamon Scones

2 cups unbleached, all-purpose flour (or half whole-wheat flour and half unbleached flour)
1 Tbs baking powder
3 Tbs sugar
1 tsp cinnamon
5 Tbs cold butter
1/2 cup miniature semi-sweet chocolate chips
1 cup milk mixed with 1 Tbs white vinegar (let stand 5 to 10 minutes)

Topping:
1 Tbs milk
1/4 cup sugar
1 to 2 tsp cinnamon

Directions:

Preheat oven to 425 degrees Fahrenheit.  Mix together the flour, baking powder, sugar and cinnamon.  Cut in the butter using a pastry blender or fork.  Stir in the chocolate chips and then fold in the milk.  Mix until the dough forms, but don't over mix.  Transfer the dough to a floured surface and knead into a ball.  Pat or roll the dough into a circle and cut it into triangles (or cut circles or another shape using a large cookie or biscuit cutter).  Place scones on a cookie sheet lined with parchment paper.  Brush each scone with milk and then sprinkle the cinnamon and sugar topping mixture over each one.  Bake for 10 to 15 minutes, or until the scones are lightly browned.

Saturday, April 6, 2013

Tales From a Stay-At-Home Mom: Why So Defensive, Mommas??

I recently had a conversation with a Working Mom that made me throw back to my days of working full-time outside the home.  I remembered trying to juggle domestic responsibilities along with the guilt of having an infant (and then toddler) in day care.   I pumped in the bathroom at work for 6 months, since that was the only room with a lock on the door.  I often went well over the speed limit to pick my daughter up on time.  I let her fall asleep on the couch so I could spend more time with her.  I beat myself up every morning when I dropped her off and she cried woefully as I left, and then I stood outside the door, waiting for her to calm down before going to work.  (Most mornings, I teared up when I got to my car.)  I crunched numbers every week, created elaborate plans, tried to figure out ways to be able to quit work.  I also envied the Stay-At-Home Moms that I knew, and wondered why it couldn't be me.   I wasn't exactly defensive about my role as a Working Mom, since I felt compelled to stay home and couldn't, but anytime anyone made a comment that was even remotely negative about my child being in day care, I suddenly turned into a lion, claws drawn, ready to pounce.

Why was I so defensive?

I prayed for almost 3 years, and then the Lord opened all the right doors.  I couldn't understand His timing, but He obviously had (and has) a plan.   As a result, I've been the Stay-At-Home Mom that I envied ever since my youngest daughter was born.  Now, my guilt centers on whether or not I'm ruining my children, since I'm the ever-present influence in their lives!  That's a blog for another day, however.  Back to my recent conversation with Working Mom:  When faced with her own question of whether she should quit work to stay at home or not, she proceeded to become rather defensive of the fact that she enjoyed working and preferred to continue doing so. 

Why was she so defensive?

I spent many hours pondering these questions, only to recollect something that I once read (I don't remember where):  The defense mechanisms we use to protect ourselves usually provide clues to our own uncertainties or fears.  My walls went up and my claws came out when others made comments about my child being in a day care.  Why?  Because I was uncertain that that was an optimal place for her to be, and I actually feared that it was harming her in some way (even though there were absolutely no signs of that, other than the usual illnesses associated with being in a day care facility).  The Working Mom I was talking to became defensive of the fact that she enjoyed her work - perhaps because of guilt that may have been imposed on her by an individual or a media outlet in the past.  Or, perhaps she feared that her enjoyment of work outside the home was in direct conflict with her nurturing instincts, and somehow made her a "bad" mother.

We get defensive when faced with our fears and uncertainties; when we are challenged to believe what very well could be an untruth about ourselves or our lives.  These fears are not from God (who is love):  "There is no fear in love. But perfect love drives out fear, because fear has to do with punishment. The one who fears is not made perfect in love" (1 John 4:18).  What we need to remember is that we're all in this together!  It's not Working Mom versus Stay-At-Home Mom.  We're ALL moms that need to support one another in the choices we have made, and we need to help guide one another if it becomes obvious that we are choosing the wrong vocation, whatever that may be (at home or outside the home).  I am not better than you because I stay home with my kids.  You are not better than me because you work to help provide monetarily for yours.  God has different plans for each one of us, and we need to keep that in mind when our human natures drive us to place another mom under judgement for her vocation.

To continue in 1 John 4:19-21:  "We love because he first loved us.  Whoever claims to love God yet hates a brother or sister is a liar. For whoever does not love their brother and sister, whom they have seen, cannot love God, whom they have not seen.   And he has given us this command: Anyone who loves God must also love their brother and sister."  Let us keep this in mind as we strive to encourage one another along the journeys that God has planned for us, whether working at home or outside of it!

Saturday, March 9, 2013

Fruit Kabobs With Sweet Cream Cheese Dip


I made these for a Super Bowl party and they were gone in a matter of minutes - and my kids (even my picky fruit eater) were ecstatic about them.  Why is food always better on a stick?!  Well, for whatever reason, it is.  This is a quick, easy, healthy potluck or party recipe.  I highly recommend the dip, but it's not necessary.  Fruit alone on a stick is good enough!

FRUIT KABOBS

1 lb. red seedless grapes
4 Mandarin oranges (or Clementines)
3 to 4 medium apples
2 large bananas
1 package of strawberries

Directions:  Wash and slice the apples, then soak them in ginger ale (yes, ginger ale - it works!) for 5 to 10 minutes and set aside.  Slice and toss the bananas with lemon juice.  Set aside.  Wash the grapes and strawberries, and slice the strawberries in half lengthwise.  Peel and separate the oranges.  Take the skewers and cut them in half (I used very sharp kitchen scissors, but a sharp chef's knife would work as well).  Thread the fruit onto the skewers, leaving about 1/2-inch on both ends so that they can be picked up.  Refrigerate until serving.  (*NOTE:  I made these about 2 hours ahead of time, and the apples and bananas did not change color!*)  This recipe makes approximately 20 skewers.


SWEET CREAM CHEESE DIP

1 package cream cheese (8 oz.)
1/2 cup brown sugar (*I cut this down to about 1/4 cup)
1 tsp vanilla
2 T sour cream

Place cream cheese in a microwave-safe bowl and microwave for about 20 seconds. Combine the remaining ingredients and mix well with a spoon or hand mixer.  Serve immediately or refrigerate until serving.


Friday, March 1, 2013

Flavored Coffee -What's In It & How to Make Your Own (Minus the Mystery Ingredients)


If you are a coffee-holic like myself, then you have probably wondered what exactly flavors your creme-brulee, chocolate-raspberry and "Jaimaican Me Crazy" brews.  The coffee packages generally don't specify the ingredients used to flavor the coffee (they just say "coffee and natural and artificial flavors"), which is rather frightening, in my opinion.  So, I decided to do a little research.    I know it's long, but it's worth the read.  According to this website,

"Flavoring oils are combinations of natural and synthetic flavor chemicals which are compounded by professional flavor chemists. Natural oils used in flavored coffees are extracted from a variety of sources, such as vanilla beans, cocoa beans, and various nuts and berries. Cinnamon, clove, and chicory are also used in a variety of coffee flavors. Synthetic flavor agents are chemicals which are manufactured on a commercial basis. For example, a nutty, woody, musty flavor can be produced with 2, 4-Dimethyl-5-acetylthiazole. Similarly, 2,5-Dimethylpyrazine is used to add an earthy, almost peanuty or potato-like flavor. Flavor chemists blend many such oils to achieve specific flavor combinations. While other food flavors may be composed of nine or 10 ingredients, coffee flavors may require up to 80 different compounds to achieve subtle flavors. Virtually any taste can be reproduced. Marketers have found that consumers prefer coffee flavors with sweet creamy notes. The ideal flavor should mask some of the harsh notes of the coffee yet not interfere with its aromatic characteristics.

The pure flavor compounds described above are highly concentrated and must be diluted in a solvent to allow the blending of multiple oils and easy application to the beans. Common solvents include water, alcohol, propylene glycol, and fractionated vegetable oils. These solvents are generally volatile chemicals that are removed from the beans by drying. Older solvent system technology produced beans which dried up and lost flavor. Current technology uses more stable solvents which leave the beans with a glossy sheen and longer lasting flavor.

The flavor chemicals and the solvents used in flavors must not only be approved for use in foods, but they must also not adversely react with the packaging material and the processing equipment with which they come into contact. Furthermore, they must meet the desired cost constraints."

A couple of things bother me about this description of coffee flavoring oils.  For starters, some coffees contain 80 different flavoring compounds!  Yuck!  In addition, according to ChemSpider, a chemical database,  2, 4-Dimethyl-5-acetylthiazole is a synthetic flavorant that causes skin, eye and lung irritation upon contact (so what exactly does it do to us when it's ingested?).  Secondly, according to ChemSpider, 2,5-Dimethylpyrazine in its chemical state carries an irreversible damage risk to the eyes, skin and lungs, is a skin and eye irritant, and is harmful if swallowed (!).  Now, I am not a chemist and I certainly hope that in their flavorant states these chemicals are in fact edible, but the facts do freak me out a bit. (As do the solvents used in the coffee flavoring process.)  That being said, I started experimenting with ways to flavor my own coffee.  Below you will find a very easy (and very yummy) way to flavor your own coffee, minus the mystery ingredients!  I hope you enjoy your chemical-free, flavored java fix :)

Easy DIY Flavored Coffee Recipe

*For a 10-cup pot of coffee, place 1/2 to 1 tsp (or more, according to your preferences) of the desired spice on top of the grounds PRIOR TO brewing.
*Brew and enjoy!
*Spices that I use frequently are pumpkin pie spice and cinnamon.  I have also used cocoa powder, or a dash of peppermint extract or vanilla extract on top of the grounds prior to brewing very successfully. 


Friday, February 8, 2013

Classic Lady Grantham Quotes (Because We All Need A Good Laugh!)


She's witty, she's sarcastic, she's prejudiced against Americans and she's amazing - easily my favorite Downton Abbey character.  Lady Grantham also reminds me of my late, Great Aunt "C" (short for Celia) - they share the same "old lady smirk", as I like to call it, and my Aunt used to have zingers very comparable to Lady Grantham's.  Since it's Friday and I certainly need a laugh after a stressful week of moving- and property management-related activities, I thought a compilation of Lady Grantham quotes was in order.  I will add to the list as the season progresses :)  Enjoy a good lol for me!

1.)

Lady Grantham: "I think it's a ridiculous idea."
Lady Sybil: "Why?"
Lady Grantham: "Because this is a house, not a hospital."
Lady Mary: "Granny, a convalescent home is where people rest and recuperate."
Lady Grantham: "But if there are relapses. What then? Amputation in the dining room? Resuscitation in the pantry?"

2.)

Sir Richard Carlisle:  "I'm leaving the morning Lady Grantham, I doubt we'll meet again."
Lady Grantham:  "Do you promise?"

3.)

Lady Grantham:  "Oh my dears. Is it really true? I can't believe it. Last night he looked so well. Of course it *would* happen to a foreigner.  It's typical."
Lady Mary:  "Don't be ridiculous."
Lady Grantham:  "I'm not being ridiculous. No Englishman would *dream* of dying in someone else's house - especially somebody they didn't even know."

4.)

Lady Grantham:  "What is a weekEND?"


5.)

Lady Grantham:  "Your turn will come."
Lady Edith:  "Will it? Or am I to be the maiden aunt? Isn't this what they do? Arrange presents for their prettier relations?"

Lady Grantham:  "Don't be defeatist dear, it's terribly middle class."

6.)

Lady Grantham: "Good heavens, what am I sitting on?"

Matthew:  "A swivel... chair."

 Lady Grantham:  "Oh, another modern brainwave?"

 Matthew:  "Not very modern; they were invented by Thomas Jefferson."

 Lady Grantham:  "Why does every day involve a fight with an American?"

 7.)

Lady Grantham:  [to Mrs. Crawley when they realize Mary will not take Matthew despite the fact that he remains the heir to the title and estate] "Your quarrel is with my daughter, Rosamund, and not with me. So put that in your pipe and smoke it."

 8.)

Lady Sybil: "No one ever learned anything from a governess except for French, and how to curtsy."

 Lady Grantham:  "What more do you need?"

9.)

Lady Grantham:  “First electricity, now telephones. Sometimes I feel as if I’m living in an H.G. Wells novel.”

10.)

Lady Grantham:  “I knew this family was approaching disillusion, I wasn’t aware that illusion was already upon us.”

11.)

Lady Grantham: “We’ll have to take her abroad, in these moments you can usually find an Italian who’s not too picky.”

12.)

Lady Grantham:  “Alas, I am beyond impropriety”